I’ve enjoyed experimenting with various dessert recipes over the years, and these Key Lime Pie Bars have become a favorite. They offer all the bright, tangy flavor of traditional key lime pie but are easy to cut and serve. After testing different crusts and fillings, I found the perfect balance of sweetness and tartness in this recipe. Here’s everything you need to know to create a batch of these delicious bars.
Why You’ll Love This Recipe
- Bursting with Flavor — The combination of fresh lime juice and zest gives these bars a vibrant citrus taste that refreshes.
- Easy Serving — Unlike classic key lime pie, these bars can be easily sliced for parties or gatherings, making them perfect for sharing.
- Quick Prep Time — With just a few simple steps, you can whip up this dessert in less than an hour (not counting chill time).
- Creamy Texture — The filling is smooth and creamy, offering a delightful contrast to the crisp crust.
- Perfectly Balanced Sweetness — Enjoy the ideal mix of sweetened condensed milk and fresh lime juice that keeps every bite satisfying without being overwhelming.

Ingredients You’ll Need
Main Ingredients:
– 2 cups vanilla wafer cookies — These form the crust that adds sweetness and crunch.
– 5 tablespoons unsalted butter — This helps bind the cookie crumbs together for a stable base.
– 2 tablespoons light brown sugar — Adds depth to the crust’s sweetness.
– 1 tablespoon lime zest — Enhances the lime flavor for a more aromatic filling.
– 5 large egg yolks — Provides richness and helps thicken the filling as it bakes.
– 22 ounces sweetened condensed milk — Serves as the base for creaminess and sweetness in your filling.
– 1 cup freshly squeezed lime juice — Delivers that zesty punch characteristic of key lime desserts.
– 1 cup heavy whipping cream — Used for making whipped cream topping; it adds richness when served on top.
– 2 tablespoons powdered sugar — Sweetens the whipped cream without adding grit.
Smart Substitutions:
- Instead of vanilla wafer cookies: Use graham cracker crumbs for a traditional crust flavor; it will be slightly less sweet but still work well with the filling.
- Instead of heavy whipping cream: Use coconut cream for a dairy-free version; it alters taste slightly but keeps it creamy.
Pro Tip: When juicing limes, roll them on your countertop before cutting. This helps release more juice, maximizing your yield.
How to Make Key Lime Pie Bars
Quick Prep Checklist:
* Gather all ingredients before starting to streamline your process.
* Preheat your oven so it’s ready when you finish preparing your filling.
Step 1: Prepare Your Crust
Start by preheating your oven to 350°F (175°C). In a food processor, combine crushed vanilla wafers with melted butter and brown sugar until well mixed. The mixture should resemble wet sand.
Tip: Make sure to press down firmly while fitting the crust into the baking pan to prevent crumbling later.
Step 2: Mix Filling
In a mixing bowl, whisk together egg yolks, sweetened condensed milk, lime juice, and lime zest until fully combined. The mixture should appear smooth without lumps.
Watch For: It’s key that there are no bits of egg yolk visible; otherwise, they may not cook evenly later on.
Step 3: Bake
Pour the filling over your prepared crust. Bake in your preheated oven for about 30 minutes or until set but still jiggly in the center.
You’ll Know It’s Ready When: You see slight cracks forming around the edges while keeping some motion in the middle—this means it has set properly without overcooking.
Step 4: Cool Down
Remove from oven and let cool at room temperature for at least one hour. After cooling slightly, refrigerate for at least two hours before slicing into bars.
Common mistakes include cutting too soon; this can lead to messy slices since it hasn’t had enough time to firm up!
Step 5: Whip Cream Topping
While waiting for your bars to chill, whip heavy cream with powdered sugar until soft peaks form—this takes only about 3–4 minutes with an electric mixer.
When ready to serve each piece, generously add whipped cream on top for extra indulgence!
✅ Perfect Results Checklist:
* The surface should have slight cracks indicating it has cooled correctly.
* Bars should feel firm yet spring back slightly when touched—indicating proper setting.
* A refreshing aroma of citrus will fill your kitchen once baked.

Expert Tips & Variations
3 Pro Tips:
* Use Fresh Limes: Freshly squeezed juice makes a noticeable difference compared to bottled versions; it enhances overall flavor considerably.
* Chill Thoroughly: Allowing ample chilling time is crucial; this ensures clean cuts without crumbling edges when you slice into bars.
* Adjust Sweetness: If you prefer sweeter flavors, add more condensed milk gradually while tasting until satisfied before baking.
3 Variations to Try:
* Coconut Lime Bars: Incorporate shredded coconut into both crust and filling for added texture and flavor twist!
* Key Lime Cheesecake Bars: Blend in softened cream cheese with egg yolks during mixing step—it creates an even richer texture if that’s what you’re after!
* Ginger Snap Crust Variation: Swap vanilla wafers with crushed ginger snap cookies for a spicier alternative that complements lemony flavors nicely!
Common Mistakes to Avoid
Mistake #1: Overbaking
I learned the hard way that bars can dry out if left too long in the oven—they lose their creamy texture completely! This happens because prolonged heat causes moisture loss which results in rubbery centers instead of silky fillings. To prevent this issue simply check regularly after 25 minutes; pull them out as soon as edges are visibly set but center remains wobbly.
Mistake #2: Using Store-Bought Juice
Most home bakers miss this detail thinking any type works fine—but using bottled juices significantly alters taste! They often contain preservatives that mask natural flavors found only in fresh fruit leading bland results overall. Stick strictly with fresh limes squeezed right at home whenever possible!
Mistake #3: Skipping Chilling Time
Some bakers rush through by serving right after cooling down—not allowing enough fridge time will make slicing difficult! Proper chilling lets flavors meld while helping firm up texture which leads beautiful bar presentation later on too! Always give yourself at least two hours post-baking before slicing into squares!
Storage & Reheating
Room Temperature: These bars do best when stored chilled but can sit covered briefly if needed during serving times without worry!
Refrigerator: Keep leftovers sealed tightly within an airtight container where they’ll last up to five days max!
Freezer: Wrap individual pieces securely with plastic wrap followed by foil—these freeze well up until three months!
Reheating:
- Oven: Preheat at low temp (around 300°F) warming slices gently about ten minutes restores texture without drying out further!
- Microwave: Set power level medium heat reheating single servings around thirty seconds maximum—watch closely so not too hot!
snacks

Key Lime Pie Bars
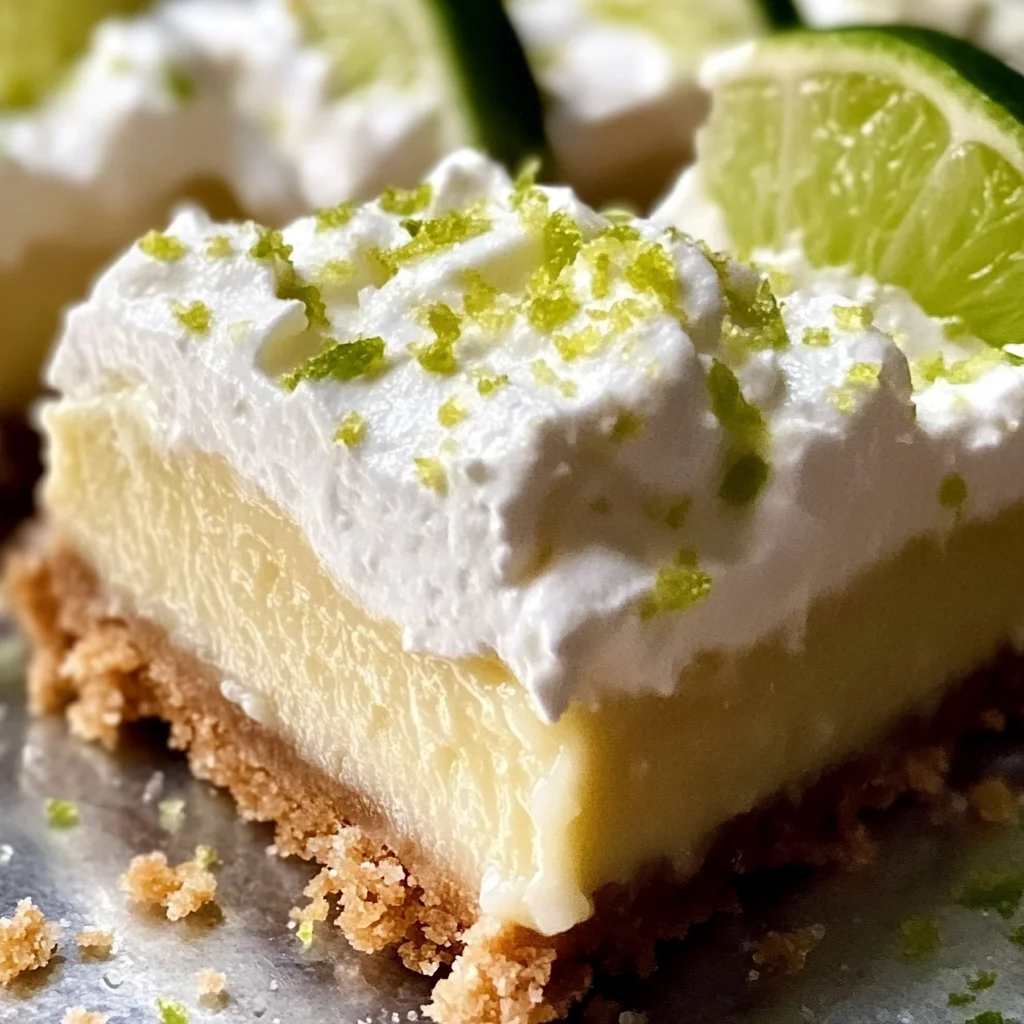
Indulge in the refreshing taste of these Key Lime Pie Bars, where every bite bursts with vibrant citrus flavor and a creamy texture that melts in your mouth. The crisp crust perfectly complements the tangy filling, creating a delightful balance that will keep you coming back for more. Ideal for gatherings or a sweet treat at home, feel free to customize with various toppings or variations to suit your taste.
- Total Time: 50 minutes
- Yield: 12 servings 1x
Ingredients
- 2 cups vanilla wafer cookies
- 5 tablespoons unsalted butter, melted
- 2 tablespoons light brown sugar
- 1 tablespoon lime zest
- 5 large egg yolks
- 22 ounces sweetened condensed milk
- 1 cup freshly squeezed lime juice
- 1 cup heavy whipping cream
- 2 tablespoons powdered sugar
Instructions
- Preheat your oven to 350°F (175°C). The warm air will set the stage for baking your delicious bars.
- In a food processor, combine crushed vanilla wafers with melted butter and brown sugar until the mixture resembles wet sand. You'll notice the sweet aroma of cookies filling the kitchen.
- Press the mixture firmly into the bottom of a baking pan to form your crust. The texture should be compact to prevent crumbling later.
- In a mixing bowl, whisk together egg yolks, sweetened condensed milk, lime juice, and lime zest until smooth and creamy. The vibrant green from the lime zest will brighten up the filling.
- Pour the filling over your prepared crust and bake for about 30 minutes or until set but still slightly jiggly in the center. You should see slight cracks forming at the edges as they bake.
- Let cool at room temperature for at least one hour before refrigerating for two hours. This cooling period is essential for achieving clean slices later.
- While waiting, whip heavy cream with powdered sugar until soft peaks form—about 3–4 minutes using an electric mixer. The sweet scent of whipped cream will fill your space.
- Serve chilled bars topped with whipped cream and enjoy!
- Prep Time: 20 minutes
- Cook Time: 30 minutes
- Category: Dessert
- Method: Baking
- Cuisine: American
Nutrition
- Serving Size: 1 bar (60g)
- Calories: 210
- Sugar: 18g
- Sodium: 150mg
- Fat: 10g
- Saturated Fat: 6g
- Unsaturated Fat: 4g
- Trans Fat: 0g
- Carbohydrates: 27g
- Fiber: 0g
- Protein: 3g
- Cholesterol: 120mg