
I’ve made a lot of no-bake desserts, but Oreo Dirt Cake stands out as a favorite. The layers of creamy filling and crunchy cookie crumbs come together in such a fun way. After some trial and error with the ratios, I found the perfect balance for flavor and texture. In this article, you’ll discover how to create this easy crowd-pleaser.
Why You’ll Love This Recipe
- No-Bake Delight — Skip the oven and enjoy a cool, creamy treat that’s perfect for warm days.
- Fun Presentation — The layered look mimics dirt, making it a hit at parties or kids’ events.
- Versatile Base — You can easily switch up flavors by using chocolate pudding instead of vanilla for a different twist.
- Make-Ahead Option — Preparing this dessert the day before allows the flavors to deepen and meld beautifully.
- Kid-Friendly Fun — Get little ones involved by letting them help crush cookies or decorate the top with candy flowers.

Ingredients You’ll Need
Main Ingredients:
– Oreo cookies — 1 package (14.3 ounce), divided; provides the classic cookie flavor and crunch.
– Cream cheese — 1 package (8 ounce), softened at room temperature; adds richness to the filling.
– Unsalted butter — 1/2 cup (1 stick), softened at room temperature; helps create a smooth texture in the cream base.
– Powdered sugar — 1 cup; sweetens the cream cheese mixture while keeping it fluffy.
– Cold milk — 3 cups; essential for preparing the pudding mix.
– Instant vanilla pudding mix — 2 packages (3.4 ounce each); thickens to form part of the creamy filling.
– Whipped topping — 1 container (8 ounce, e.g., Cool Whip), thawed; lightens up the filling for an airy texture.
– Pectin-based gummy candies or candy flowers — 12-15 pieces; adds decorative flair on top.
Smart Substitutions:
- Instead of cream cheese: Use mascarpone cheese — it gives a slightly sweeter taste and smoother texture.
- Instead of cold milk: Substitute with almond milk for a dairy-free option that works well in puddings.
Pro Tip: When softening cream cheese and butter, cut them into small pieces and leave them out for about 30 minutes before starting your recipe. This speeds up softening time significantly.
How to Make Oreo Dirt Cake
Quick Prep Checklist:
* Crush about three-fourths of your Oreos into fine crumbs.
* Soften your cream cheese and butter before mixing.
Step 1: Prepare the Dirt
Crushing Oreos is where you start. Place about three-fourths of them in a resealable bag and crush until fine crumbs form—this should take just a couple of minutes with a rolling pin or food processor. You’ll know it’s ready when you have nice, even crumbs without large chunks remaining.
Tip: Avoid over-crushing, which can turn crumbs into powder—aim for a sand-like consistency.
Step 2: Make the Cream Cheese Base
In a large mixing bowl, beat together softened cream cheese, unsalted butter, and powdered sugar until fluffy—around two to three minutes. Scrape down the sides periodically to ensure everything mixes well. It should be light in color and smooth when done.
Watch For: A pale yellow color indicates that air has been whipped into your mixture correctly.
Step 3: Prepare the Pudding
In another bowl, whisk cold milk with instant vanilla pudding mixes until it starts to thicken—this takes about two minutes. Let it sit for five more minutes so it sets properly before combining it with other ingredients.
You’ll Know It’s Ready When: The pudding holds its shape when lifted off whisk tines but isn’t overly firm.
Step 4: Combine Filling Components
Fold thawed whipped topping into your cream cheese mixture gently until no streaks remain, then fold in prepared pudding carefully until mixed smoothly together. Aim for an even blend without deflating your mixture too much to keep it fluffy.
A common mistake here is over-mixing; this can lead to loss of airiness in your filling—a gentle touch is key!
Step 5: Assemble Your Dirt Cake
Spread one-third of crushed Oreo crumbs evenly at the bottom of your baking dish or trifle bowl—make sure it’s compact but not packed down too hard. Add half of your creamy pudding mixture on top next and spread gently toward edges without disturbing crumb layer too much. Repeat layers with remaining ingredients ending on crushed Oreos as top layer like dirt!
Once assembled, cover tightly with plastic wrap before chilling.
✅ Perfect Results Checklist:
* Layers are visible through glass if using trifle bowl.
* Top layer looks like dark soil without any gaps showing through.
* Creamy filling should be smooth yet hold shape when scooped out.

Expert Tips & Variations
3 Pro Tips:
* Chill Time Is Key: Allowing your dessert to chill overnight really enhances flavors as they meld together beautifully—the wait is worth it!
* Layer Wisely: Ensure each layer is even for better presentation—it makes serving easier too!
* Use Fresh Toppings: Opt for fresh fruit or sprinkles if you want added texture or visual appeal instead of gummy candies.
3 Variations to Try:
* Chocolate Lovers Version: Swap vanilla pudding mix with chocolate instant pudding mix for extra chocolaty goodness—it complements Oreos perfectly!
* Peanut Butter Twist: Mix in some peanut butter with your cream cheese base—adds depth while pairing nicely with chocolate flavors from Oreos!
* Fruit-Filled Delight: Layer fresh berries between cookie layers for added freshness—a surprising burst alongside sweet custard!
Common Mistakes to Avoid
Mistake #1: Overmixing Your Cream Cheese Mixture
I learned this lesson when my filling turned dense instead of airy. Overmixing incorporates too much air and causes separation later on during chilling. To avoid this issue, mix just until smooth without beating continuously once combined properly.
Mistake #2: Not Allowing Pudding To Set
Many overlook letting their pudding sit adequately after mixing—it can lead to runny layers that don’t hold up well when sliced! Properly allowing time ensures proper thickening occurs giving structure needed during assembly stages too!
Mistake #3: Skipping Chilling Time
I’ve seen cakes served too soon resulting in messy servings that fell apart completely! Failing to chill means layers won’t set firmly enough leading towards soggy textures overall! Always remember—it’s best left overnight wrapped tight!
Storage & Reheating
Room Temperature: This dessert should not be left out longer than an hour at room temp since dairy components need refrigeration quickly after serving time ends!
Refrigerator: Store covered leftovers in an airtight container up to three days maximum without sacrificing quality!
Freezer: Wrap tightly using plastic wrap then foil safely before freezing—a month will keep flavors intact though freshness reduces slightly over prolonged periods!
Reheating:
* Oven: Not applicable; best enjoyed chilled straight from refrigerator—not baked again!
* Microwave: Again not recommended due potential melting issues within layered structure yielding less desirable results instead focus solely upon serving chilled version only!
Frequently Asked Questions
How long does Oreo Dirt Cake last?
This dessert typically lasts about three days stored securely within an airtight container in refrigeration—however best enjoyed within first day after assembling due freshness factor!
Can I freeze this dessert?
While possible, freezing may alter texture once thawed creating less appealing result compared enjoying fresh versions right after chilling period completes! If necessary wrap tightly using plastic wrap beforehand followed by foil ensuring moisture retained best way possible during storage process!
What can I use instead of Cool Whip?
If you’re looking for alternatives consider homemade whipped topping made from heavy whipping cream—with sugar added gradually till soft peaks achieved brings similar delightful outcome without store bought products used here!
Can I make individual servings?
Certainly! Use small jars or cups layering accordingly allowing guests personal portions perfect party idea especially when serving larger gatherings where multiple options offered become ideal setup overall experience wise!
Final Thoughts
This recipe delivers on every level—from flavor balance between sweetness complemented perfectly by crunchiness enjoyed throughout every scoop taken from dish itself! You’ll find joy impressively displayed simply having gathered friends around enjoying delicious dessert freshly made right now!
Feel free share thoughts below after trying out this fantastic treat that brings comfort while satisfying cravings effortlessly along way—we all deserve having indulgent moments every once awhile don’t we?
Loved this recipe? Leave a comment below—I read every one! Rate it ⭐⭐⭐⭐⭐and share it with a friend who’d love it.
Focus keyphrase: Oreo Dirt Cake
SEO title: Easy No-Bake Treats: Perfect Dessert Everyone Will Love
Meta description: Discover how easy it is to make Oreo Dirt Cake at home! This fun dessert layers cookies & creamy goodness everyone will enjoy sharing today.
Focus keyphrase synonyms: Oreo cake recipe, easy dirt cake recipe, how to make dirt cake at home, no-bake oreo dessert recipe, best oreo desserts ever made, quick dirt cake ideas kids love,
Oreo cookie dirt cake steps,
delicious layered desserts ideas,
no bake treats everyone enjoys,
party desserts people ask about,
fun recipes using oreos,
dirt cake variations for gatherings,
easy kid-friendly desserts ideas,
best chocolate pudding recipes,
layered desserts simple ways,
cookies-and-cream treats homemade,
dessert ideas suitable warm weather occasions,
instant pudding desserts you can try
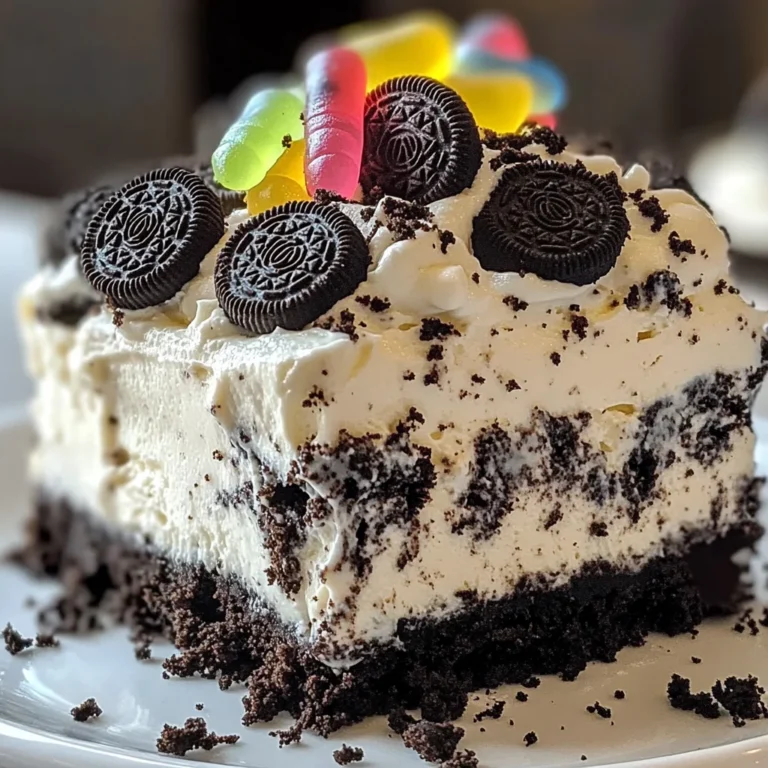
Oreo Dirt Cake
Indulge in the delightful layers of Oreo Dirt Cake, where creamy filling meets crunchy cookie crumbs for a dessert that’s both fun and satisfying. Each spoonful offers a cool, velvety texture that contrasts beautifully with the crumbly chocolate top, making it a crowd-pleaser at any gathering. Enjoy the satisfaction of creating this no-bake treat, and feel free to customize it by adding your favorite toppings or using different flavored pudding.
- Total Time: 30 minutes
- Yield: 10 servings 1x
Ingredients
- 1 package Oreo cookies (14.3 ounce), divided
- 1 package cream cheese (8 ounce), softened
- 1/2 cup unsalted butter (1 stick), softened
- 1 cup powdered sugar
- 3 cups cold milk
- 2 packages instant vanilla pudding mix (3.4 ounce each)
- 1 container whipped topping (8 ounce), thawed
- 12–15 pieces pectin-based gummy candies or candy flowers
Instructions
- Crush about three-fourths of the Oreos in a resealable bag until fine crumbs form, aiming for a sand-like consistency.
- In a large mixing bowl, beat together the softened cream cheese, unsalted butter, and powdered sugar until fluffy and smooth.
- In another bowl, whisk cold milk with the instant vanilla pudding mixes until thickened, then let it sit for five minutes to set properly.
- Gently fold the thawed whipped topping into the cream cheese mixture until no streaks remain, then fold in the prepared pudding carefully.
- In a baking dish or trifle bowl, spread one-third of the crushed Oreos at the bottom, add half of the creamy pudding mixture on top, and repeat layers ending with crushed Oreos as the top layer before chilling.
- Prep Time: 30 minutes
- Cook Time: 0 minutes
- Category: Dessert
- Method: No-Bake
- Cuisine: American
Nutrition
- Serving Size: 1/10 of dessert (100g)
- Calories: 320
- Sugar: 22g
- Sodium: 300mg
- Fat: 18g
- Saturated Fat: 10g
- Unsaturated Fat: 7g
- Trans Fat: 0g
- Carbohydrates: 36g
- Fiber: 1g
- Protein: 3g
- Cholesterol: 35mg