I’ve always enjoyed baking festive treats for special occasions, and St. Patrick’s Day Green Crinkle Cookies are a fun way to celebrate the holiday. These cookies are bright green, chewy, and coated in powdered sugar, making them both visually appealing and tasty. After some experimenting with the dough’s texture and chilling time, I found just the right balance for perfect crinkles. In this article, I’ll guide you through making these festive cookies step-by-step.
Why You’ll Love This Recipe
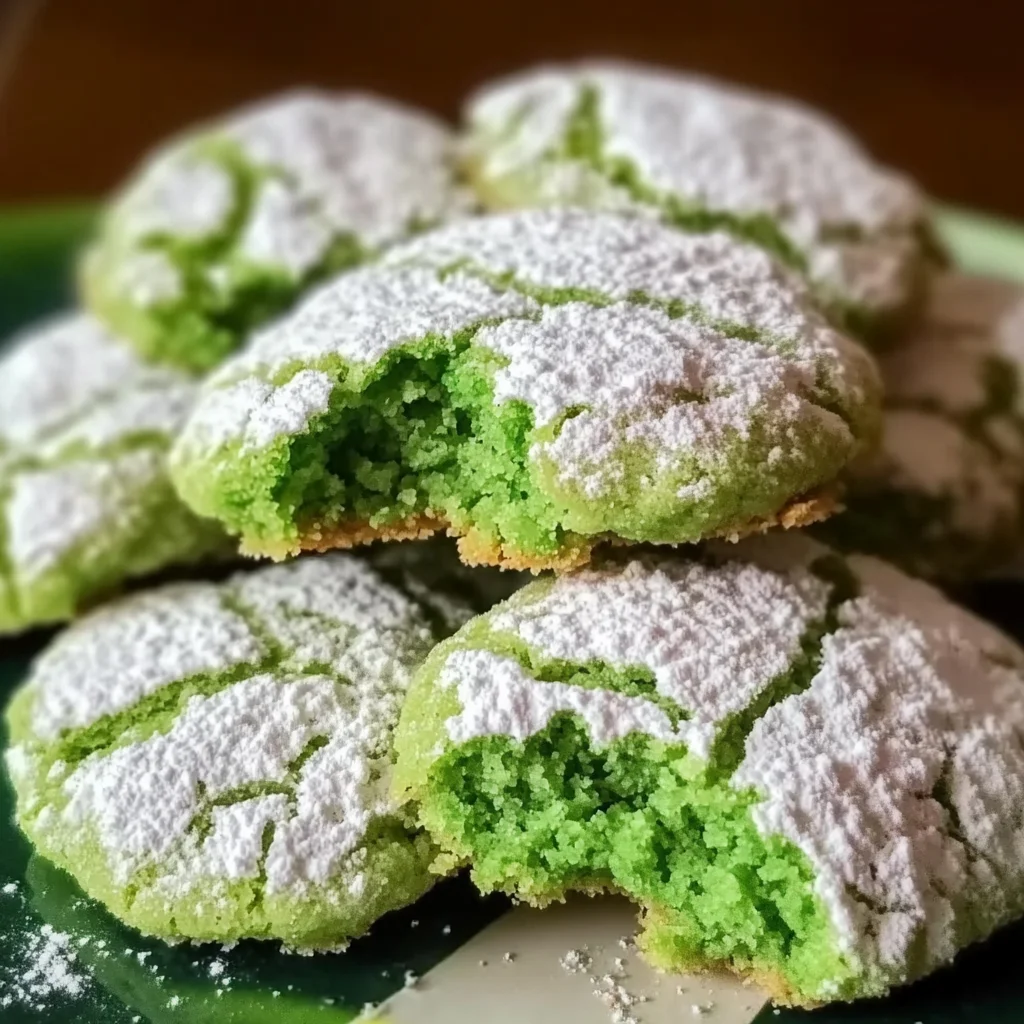
- Bright Green Color — The vibrant green food coloring makes these cookies stand out on any dessert table.
- Chewy Texture — With a slight crisp on the outside and a soft interior, each bite is satisfying.
- Quick Prep Time — You can whip these up in no time, making them ideal for last-minute gatherings.
- Fun for All Ages — Kids love rolling the dough in powdered sugar; it’s a fun activity!
- Versatile for Celebrations — These cookies aren’t just for St. Patrick’s Day; they’re great for birthdays or Christmas too.
Ingredients You’ll Need
Main Ingredients:
– 1 cup granulated sugar
– ½ cup vegetable oil
– 2 large eggs
– 1 teaspoon vanilla extract
– 1 teaspoon baking powder
– ½ teaspoon salt
– 1 ½ cups all-purpose flour
– 1 tablespoon green food coloring
– Powdered sugar for rolling
Smart Substitutions:
- Instead of granulated sugar: Use coconut sugar — this will give your cookies a slightly different flavor and color.
- Instead of vegetable oil: Use melted coconut oil — this will add a hint of coconut flavor to your batch.
- Instead of all-purpose flour: Try using gluten-free flour blend — it works well in most recipes without changing the taste much.
Pro Tip: When buying food coloring, choose gel-based options instead of liquid. They provide more vibrant colors without adding extra liquid to your batter.
How to Make St. Patrick’s Day Green Crinkle Cookies
Quick Prep Checklist:
* Gather all ingredients before starting to save time.
* Chill the dough while preheating your oven to get better crinkles.
Step 1: Mix Wet Ingredients
In a mixing bowl, blend together granulated sugar and vegetable oil until it’s well combined. Add in the eggs and vanilla extract, beating everything together until smooth and creamy. Your mixture should look glossy before moving on.
Tip: Make sure not to overmix at this stage; otherwise, your cookies may turn tough.
Step 2: Combine Dry Ingredients
In another bowl, whisk together the baking powder, salt, and flour until evenly mixed. Gradually add this dry mixture into your wet ingredients until you see no more streaks of flour. The dough will be thick but not dry at this point; it should hold its shape when scooped out.
Watch For: A firm yet pliable dough that doesn’t stick excessively to your fingers means you’re on track.
Step 3: Add Food Coloring
Stir in the green food coloring gradually until you achieve your desired shade of green—bright but not overwhelming is best! If you want an even deeper color, don’t hesitate to add a bit more food coloring as needed.
You’ll Know It’s Ready When: The dough takes on an even hue without any patches of uncolored dough left showing.
Step 4: Chill Dough
Cover the bowl with plastic wrap or transfer the dough to an airtight container. Place it in the refrigerator for about 30 minutes; this helps maintain shape during baking by firming up the fat content in the dough.
Don’t skip this step; it’s crucial for achieving those lovely crinkles!
Step 5: Shape & Bake
Preheat your oven to 350°F (175°C) while scooping tablespoon-sized portions of chilled dough onto your hands to roll into balls. Roll each ball generously in powdered sugar before placing them on a lined baking sheet spaced about two inches apart. Bake for about 10-12 minutes until edges appear set but centers remain soft and slightly puffy—this ensures that chewy texture we love!
Let cool on the baking sheet for a few minutes before transferring them onto a wire rack to finish cooling completely.
✅ Perfect Results Checklist:
* Evenly puffed cookies with crinkled tops.
* Chewy texture when bitten into.
* Sweet aroma filling your kitchen as they bake.
Expert Tips & Variations
3 Pro Tips:
* Chilling Time Matters: Don’t rush chilling! Properly chilled dough helps form those signature crinkles by keeping their shape during baking.
* Measure Flour Correctly: Use a spoon to scoop flour into measuring cups instead of scooping directly from the bag; this prevents dense cookies due to excess flour.
* Check Ovens Regularly: Ovens vary; keep an eye on these while they bake so you don’t overcook or underbake them.
3 Variations to Try:
* Mint Chocolate Chip Crinkle Cookies: Add mint chocolate chips into your batch after mixing—the mint pairs well with green!
* Lemon Zest Addition: Incorporate lemon zest into the wet ingredients for a fresh twist that brightens up flavors beautifully.
* Rainbow Swirl Version: Instead of plain green dye, divide dough into parts colored like rainbows before swirling together gently—great fun visually!
Common Mistakes to Avoid
Mistake #1: Overmixing Dough
I learned that if you mix too vigorously after adding flour, you’ll end up with tough cookies instead of soft ones. This happens because gluten develops too much when overworked. To prevent it, mix just until combined; some small lumps are okay.
Mistake #2: Skipping Chilling Time
Most home bakers miss this step thinking it’s unnecessary—but I found that skipping chilling leads them spreading too much during baking! This occurs because warmer fats melt quickly in hot ovens without setting first. Always chill for at least half an hour before baking!
Mistake #3: Not Using Parchment Paper
If you forget parchment paper or greasing sheets altogether, they may stick badly once baked—trust me! Cookies stick because there’s nothing preventing their surface from adhering directly to metal pans while cooking. Always line sheets properly beforehand!
Storage & Reheating
Room Temperature: Store leftovers in an airtight container at room temperature for up to three days if they last!
Refrigerator: Keep them refrigerated in an airtight container where they’ll stay fresh for about one week without becoming dry or stale easily!
Freezer: Wrap individual cookies tightly using plastic wrap followed by aluminum foil—this method keeps them protected from freezer burn—for up four months frozen safely!
Reheating:
* Oven: Preheat oven at low temperatures (around 300°F) warming each cookie around five minutes brings back warmth while restoring chewiness effectively!
* Microwave: Set microwave power level medium heat then warm each cookie only around ten seconds maximum so avoid drying out completely!
* Stovetop: Place non-stick skillet over low heat covering with lid briefly till warmed through ensuring moisture remains intact during reheating phase carefully!
Frequently Asked Questions
What makes crinkle cookies different from regular cookies?
Crinkle cookies have their signature cracked top created during baking due mostly due structural changes happening inside when rising rapidly against outer crust forming simultaneously—a delicious contrast between textures!
Can I use different colors than green?
Absolutely! You can experiment using any color food dye you’d like which makes them versatile enough not just limited celebrating St.Patrick’s Day alone—you could create colorful treats year-round!
How do I know when my batch is done baking?
Your batch is ready when edges appear set with tops remaining slightly puffy—they’ll flatten as they cool down afterward ensuring chewiness remains intact overall producing delightful results every time guaranteed!
Can I freeze these once baked?
Yes indeed—you can freeze leftover batches easily as described above preserving quality well within proper wrapping methods ensuring freshness lasts longer keeping flavors intact successfully!
Final Thoughts
These St. Patrick’s Day Green Crinkle Cookies are sure hits at any gathering or celebration throughout springtime festivities! Their delightful appearance alongside chewy goodness makes sharing easy—and enjoyable—for everyone involved!
If you’re excited about trying these yourself or have made some already feel free leaving comments below—I read every single one! Rate my recipe ⭐⭐⭐⭐⭐ if you loved it too and share with friends who might appreciate colorful desserts like these!
St. Patrick’s Day Green Crinkle Cookies
Celebrate special occasions with St. Patrick’s Day Green Crinkle Cookies that are as delightful to look at as they are to eat. The bright green color pops against the snowy powdered sugar coating, and with each bite, you’ll enjoy a chewy texture that is perfectly balanced by a slight crispiness on the outside. These cookies are not only a feast for the eyes but also a fun baking activity for all ages. Feel free to customize them with your favorite mix-ins or color variations!
- Total Time: 27 minutes
- Yield: 24 servings 1x
Ingredients
- 1 cup granulated sugar
- ½ cup vegetable oil
- 2 large eggs
- 1 teaspoon vanilla extract
- 1 teaspoon baking powder
- ½ teaspoon salt
- 1 ½ cups all-purpose flour
- 1 tablespoon green food coloring
- Powdered sugar for rolling
Instructions
- In a mixing bowl, blend together granulated sugar and vegetable oil until combined and glossy. Add eggs and vanilla extract, beating until smooth and creamy.
- In another bowl, whisk together baking powder, salt, and flour until mixed. Gradually add this dry mixture into the wet ingredients until no streaks of flour remain.
- Stir in green food coloring gradually until you achieve your desired shade of green; the dough should be uniform and vibrant without patches.
- Cover the dough with plastic wrap or transfer it to an airtight container and refrigerate for about 30 minutes to firm up.
- Preheat your oven to 350°F (175°C). Roll tablespoon-sized portions of chilled dough into balls, then roll each ball generously in powdered sugar before placing them on a lined baking sheet.
- Bake for about 10-12 minutes until edges are set but centers remain soft; they will flatten slightly as they cool.
- Prep Time: 15 minutes
- Cook Time: 12 minutes
- Category: Dessert
- Method: Baking
- Cuisine: American
Nutrition
- Serving Size: 1 cookie (25g)
- Calories: 100
- Sugar: 8g
- Sodium: 50mg
- Fat: 4g
- Saturated Fat: 0g
- Unsaturated Fat: 0g
- Trans Fat: 0g
- Carbohydrates: 15g
- Fiber: 0g
- Protein: 1g
- Cholesterol: 20mg