
I’ve always loved the delicate flavor of rose in desserts, and this Elegant Rose and Pistachio Naked Cake perfectly captures that charm. After several rounds of testing, I found just the right amount of rose water to complement the pistachios without overpowering them. The result is a cake that’s not only visually stunning but also deliciously subtle. In this article, you’ll find a detailed guide to making this beautiful cake for your next celebration.
Why You’ll Love This Recipe
- Elegant presentation — The naked design highlights the lovely layers and toppings, making it perfect for special occasions.
- Unique flavors — The combination of pistachios and rose creates a sophisticated taste profile that stands out.
- Versatile servings — Ideal for weddings, birthdays, or any gathering; everyone will appreciate its beauty and flavor.
- Textural contrast — The airy whipped cream pairs beautifully with the dense sponge, adding a satisfying mouthfeel.
- Customizable — Easily adjust the amount of rose water based on your personal preference for floral notes.
Ingredients You’ll Need
Main Ingredients:
– 1 ¾ cups (220g) all-purpose flour — Forms the base structure of the cake.
– ¾ cup (90g) shelled pistachios, finely ground — Adds flavor and moisture to the sponge.
– 1 ½ teaspoons baking powder — Provides lift to create a light cake texture.
– ½ teaspoon baking soda — Works with baking powder for additional leavening.
– ¼ teaspoon fine sea salt — Enhances overall flavor balance.
– ¾ cup (170g) unsalted butter, softened — Creates richness and tenderness in the cake.
– 1 cup (200g) granulated sugar — Sweetens and helps with browning during baking.
– 3 large eggs, room temperature — Binds ingredients together while adding moisture.
– 1 teaspoon pure vanilla extract — Adds depth of flavor to the batter.
– ¾ cup (180ml) whole milk — Keeps the batter moist and contributes to a tender crumb.
– 2 cups (480ml) heavy cream, cold — Essential for whipping into fluffy frosting.
– ¼ cup (30g) powdered sugar — Sweetens whipped cream without affecting its stability as much as granulated sugar would.
– 1 ½ teaspoons rose water (adjust to taste) — Imparts a fragrant floral note; use sparingly at first.
– 1 teaspoon vanilla extract — Complements the floral notes from the rose water.
– Chopped pistachios (unsalted) for garnish — Adds crunch and visual appeal on top of your cake.
– Fresh edible rose petals (optional) — Enhance presentation with a natural touch; make sure they are food safe.
– Light dusting of powdered sugar for garnish — Finishes off the look with an elegant touch.
Smart Substitutions:
- Instead of all-purpose flour: Use gluten-free flour blend—this maintains texture but may change density slightly.
- Instead of heavy cream: Use coconut cream—this creates a dairy-free version with different flavor notes.
- Instead of granulated sugar: Try coconut sugar—this adds slight caramel tones but will alter color.
Pro Tip:
Purchase shelled pistachios from bulk bins or specialty stores for better freshness and flavor. Grinding them fresh before using maximizes their nutty aroma in your batter.
How to Make Elegant Rose and Pistachio Naked Cake
Quick Prep Checklist:
- Preheat your oven to ensure even baking from start to finish.
- Prepare your pans ahead by greasing and lining them with parchment paper.
Step 1: Preparing Your Pans
Preheat your oven to 350°F (175°C). Grease two 8-inch round cake pans thoroughly and line their bottoms with parchment paper. This step prevents sticking during removal after baking.
Tip: Use cooking spray or butter combined with flour on your pans for better release.
Step 2: Grinding Pistachios
In a food processor, grind shelled pistachios until they are finely ground but still slightly coarse—about 20 seconds should suffice. This texture adds both flavor and some bite in your cake layers.
Watch For: A fine meal consistency; avoid turning it into paste or butter.
Step 3: Mixing Dry Ingredients
In a medium bowl, sift together all-purpose flour, ground pistachios, baking powder, baking soda, and salt until well blended. This ensures even distribution of leaveners throughout your batter.
You’ll Know It’s Ready When: All dry ingredients are uniformly mixed without any lumps remaining.
Step 4: Creaming Butter & Sugar
In a large mixing bowl, beat softened unsalted butter with granulated sugar using an electric mixer on medium speed until light in color and fluffy—about 3–4 minutes will do nicely. This aeration helps create an airy structure in your cake layers.
Avoid overmixing at this stage; if you do so too excessively after adding eggs or dry ingredients, it could lead to denser cakes.
Step 5: Combining Wet & Dry Ingredients
Add eggs one at a time to your creamed butter mixture; mix well after each addition before stirring in vanilla extract. Gradually incorporate dry ingredients alternating with milk starting with dry—this keeps batter smooth while preventing lumps from forming during mixing.
Once everything is combined but not overmixed; you’ll get that perfect tender crumb in every slice!
Step 6: Baking Cakes
Evenly divide this thick batter between prepared pans providing you have smoothed out tops evenly as well. Bake cakes in preheated oven for about 25–30 minutes until they spring back when gently pressed or toothpick inserted comes out clean!
Most home bakers miss this point when pressing lightly—the cakes should feel firm yet soft just under surface tension which indicates they’re done without being overbaked!
Step 7: Cooling Cakes
Allow cakes cool in pans for approximately ten minutes before carefully turning out onto wire racks where they’ll need cooling completely before assembly!
This cooling period is crucial; if you rush assembly while still warm it could cause melting issues later during frosting!
Step 8: Whipping Cream
Chill mixing bowl along with beaters before whipping cold heavy cream alongside powdered sugar along with rose water plus vanilla until soft peaks form—around three minutes usually does trick here! Adjust sweetness based on preference if needed by tasting as you go along!
Take care not whip so long that stiff peaks form which would render whipped cream unusable later on!
Final Assembly
With cooled cakes ready now place one layer onto serving plate then generously spread layer topped using rose-scented whipped cream evenly across surface followed by adding second layer atop gently pressing down slightly ensuring stability throughout assembly steps taken afterwards too!
Top off whole thing using remaining whipped cream smoothing lightly over top keeping sides exposed maintaining naked style appearance desired here!
Sprinkle chopped unsalted pistachios around edges plus center then optionally add edible flower petals finished off bit powdered sugar dust too completing gorgeous display ready serve chilled once set about half hour fridge prior cutting slices later on too!
Expert Tips & Variations
Pro Tips:
- Room Temperature Eggs: Using room temperature eggs integrates easily into batters leading towards fluffier outcomes than cold ones!
- Sifting Flour: Even though many skip sifting nowadays—it really does help incorporate air within flour reducing clumps making better structure/texture results!
- Refrigerate Before Serving: Chilling finished decorated cake prior slicing allows whipped topping settle nicely preventing potential slippage danger while slicing up pieces later leaving everyone satisfied!
Variations to Try:
- Rose Raspberry Variation: Replace half rose water quantity using raspberry puree instead creating vibrant contrasting flavors brightening overall appeal!
- Pistachio Cardamom Twist: Add ground cardamom alongside existing spices within batter develops aromatic essence enhancing complexity!
- Vegan Version Swap-In: Substitute dairy products utilizing flaxseed egg replacements paired non-dairy alternatives creating equally delightful dessert experience!
Common Mistakes to Avoid
Mistake #1: Overmixing Batter
I learned the hard way that mixing too long can yield tough cakes rather than fluffy ones expected! The gluten develops overly resulting chewy textures undesirable here instead lightness sought after ultimately ruining final product satisfaction therefore stop once just combined gently through steps outlined above returning desired outcome perfection achieved previously discussed earlier here…
Mistake #2: Incorrect Oven Temperature
Most home bakers miss this when preheating ovens properly might neglect monitoring temperature causing unevenly baked goods leading possible uncooked centers arising unexpectedly worse still burnt edges appearing outside ruining aesthetics entirely! To ensure correct functioning check thermometer accuracy adjusting accordingly based upon readings noted consistently running checks periodically throughout sessions performed regularly adjusting settings proactively accordingly thereafter…
Mistake #3: Skipping Cooling Time
I noticed skipping cooling times often leads straight into assembly means melted toppings sliding around everywhere rather than staying put effortlessly decorating surfaces intended causing chaos visually especially disappointing guests expecting pristine presentations arriving soon approaching tables! Always allow enough patience letting things cool completely ensuring success remains intact successfully achieved through careful planning executed logically beforehand…
Storage & Reheating
Room Temperature: Leftovers can be kept covered at room temperature up to two days safely enjoyed anytime needed thereafter boosting convenience factor significantly!
Refrigerator: Store chilled leftovers sealed tight container lasting up five days maximum keeping flavors fresh longer preserving quality overall integrity retained consistently…
Freezer: Wrap portions individually plastic wrap plus foil securely freeze enduring maximum three months retaining freshness during storage life cycle allowing indulgences whenever cravings arise unexpectedly stronger urging sweet tooth satisfyingly fulfilled joyfully feeling fulfilled again…
Reheating:
* Oven: Warm leftover pieces at low temp─300°F about ten fifteen minutes restoring soft textures previously enjoyed…
*Microwave:* Heat single slice thirty seconds high power checking frequently avoiding overheating risking dryness while reheating effectively quickly available options prove helpful promptly getting back enjoying favorites fast...

*Stovetop:* Place skillet medium heat cover lid trapping moisture allowing gentle warming process keeping softness intact delightful experiences reminiscing fond memories made initially delightfully shared moments relished amongst loved ones around table together reconnecting joyously…
Frequently Asked Questions
How do I make sure my cake layers rise properly?
To ensure good rising power occurs considering room temperature items blending into batters smoothly keeps everything uniform avoiding inconsistencies later yielding optimal results worth remembering always paying attention essential details matter greatly overall success achieved continuously striving excellence every time encountered subsequently…
What’s the best way to store leftover naked cake?
Store leftover pieces tightly wrapped inside containers refrigerator lasts maximum five days retaining freshness best enjoyed soonest possible enjoying delightful treats repeatedly reaping benefits gained indulging frequently via opportunity presented regularly…
Can I bake this recipe in advance?
Yes! Prepare ahead storing unfrosted cooled layers placing wax/parchment papers between stacks freezing up three months allowing leisurely preparation methods employed conveniently putting efforts ensured prioritizing relaxing enjoyment afterward focusing attention other matters needing consideration…
What can I use instead of heavy cream?
If looking lighter alternatives opting coconut milk offers creamy texture resembling richness sought after helping achieve desired outcomes maintaining integrity within recipes achieving similar textures etc., ensuring no compromise exists whatsoever regarding quality satisfaction experienced throughout times spent delightfully indulging favorites continually discovering new improvements added enhancements enrich lives richly inspiring repeatedly revisiting old traditions rekindling relationships strengthened through shared culinary adventures created together…
Final Thoughts
This Elegant Rose and Pistachio Naked Cake brings beauty alongside enchanting flavors right into gatherings big small alike effortlessly satisfying guests’ cravings now fulfilled exquisitely prepared lovingly crafted remembering moments passed cherished forevermore…
Try making this dessert soon—it’s simple enough yet elegant enough make lasting impressions friendships renewed connections flourish growing deeper bonds celebrating joys life shared uniquely unforgettable experiences cultivated together through immersive culinary journeys taken collectively discovering pleasures explore beyond limits imagined previously found therein…
Loved this recipe? Leave a comment below—I read every one! Rate it ⭐⭐⭐⭐⭐ and share it with a friend who’d love it.

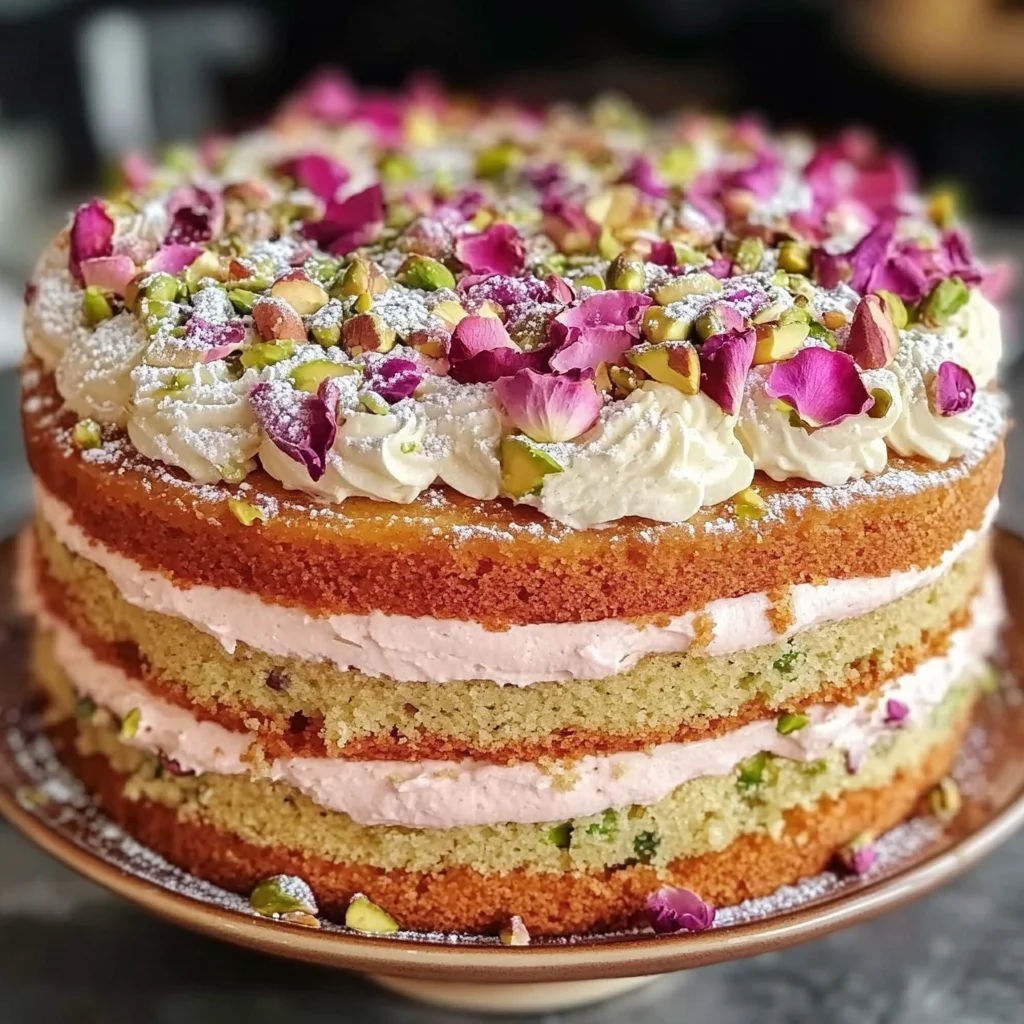
Elegant Rose and Pistachio Naked Cake
Indulge in the delicate flavors of this Elegant Rose and Pistachio Naked Cake, where the floral aroma of rose water complements the nutty richness of finely ground pistachios. As you slice into this beautiful cake, you’ll be greeted by its light texture and subtle sweetness, making it an irresistible treat for any occasion. Customize the level of rose water to suit your taste and create a dessert that is uniquely yours.
- Total Time: 1 hour
- Yield: 12 servings 1x
Ingredients
- 1 ¾ cups all-purpose flour
- ¾ cup shelled pistachios, finely ground
- 1 ½ teaspoons baking powder
- ½ teaspoon baking soda
- ¼ teaspoon fine sea salt
- ¾ cup unsalted butter, softened
- 1 cup granulated sugar
- 3 large eggs, room temperature
- 1 teaspoon pure vanilla extract
- ¾ cup whole milk
- 2 cups heavy cream, cold
- ¼ cup powdered sugar
- 1 ½ teaspoons rose water (adjust to taste)
- 1 teaspoon vanilla extract
- Chopped pistachios for garnish
- Fresh edible rose petals (optional)
- Light dusting of powdered sugar for garnish
Instructions
- Preheat your oven to 350°F (175°C) and prepare two 8-inch round cake pans by greasing and lining them with parchment paper, ensuring easy removal later.
- In a food processor, grind shelled pistachios until finely ground but still slightly coarse; this will enhance both flavor and texture in your cake layers.
- Sift together flour, ground pistachios, baking powder, baking soda, and salt in a medium bowl until well blended for uniform leavening.
- In a large mixing bowl, beat softened butter with granulated sugar until light and fluffy; this aeration helps create a tender cake structure.
- Add eggs one at a time to the butter mixture, mixing well after each addition before incorporating vanilla extract; this ensures a smooth batter.
- Gradually add dry ingredients alternating with milk starting with dry; mix until just combined for a perfect crumb without overmixing.
- Divide the batter evenly between prepared pans and smooth out the tops before baking for about 25–30 minutes or until a toothpick comes out clean.
- Allow cakes to cool in pans for ten minutes before transferring to wire racks to cool completely—this prevents melting issues during frosting.
- In a chilled mixing bowl, whip cold heavy cream with powdered sugar and rose water until soft peaks form; taste and adjust sweetness if needed.
- Place one cooled cake layer on a serving plate and spread rose-scented whipped cream evenly across it before gently placing the second layer on top.
- Top with remaining whipped cream smoothly over the top while keeping sides exposed for that elegant naked style appearance.
- Garnish with chopped unsalted pistachios around the edges and center, adding optional edible flower petals and a dusting of powdered sugar.
- Prep Time: 30 minutes
- Cook Time: 30 minutes
- Category: Dessert
- Method: Baking
- Cuisine: American
Nutrition
- Serving Size: 1 slice (100g)
- Calories: 360
- Sugar: 19g
- Sodium: 220mg
- Fat: 24g
- Saturated Fat: 14g
- Unsaturated Fat: 8g
- Trans Fat: 0g
- Carbohydrates: 34g
- Fiber: 1g
- Protein: 6g
- Cholesterol: 95mg