I’ve always enjoyed no-bake desserts, especially when they’re quick to whip up. Margarita Balls are a fun treat that blend creamy and tangy flavors without the fuss of baking. During my experiments, I discovered that adjusting the lime juice can really enhance the flavor balance. In this article, you’ll find not only the recipe but also tips for making these delicious bites even better.
Why You’ll Love This Recipe
- Perfect for Parties — These treats make a festive addition to any gathering with their appealing appearance and flavor.
- No Baking Required — Save time by skipping the oven; just mix, chill, and serve your batch.
- Customizable Flavor — Adjust the lime juice or add zest for a personalized twist on classic flavors.
- Easy to Store — Keep leftovers in the fridge for convenient snacks throughout the week.
- Kid-Friendly Activity — Making these balls is a fun way to involve kids in the kitchen while creating something tasty.
Ingredients You’ll Need
Main Ingredients:
– * Cream cheese — 8 oz, provides a rich base for your filling.
– * Lime juice — 2 tbsp, adds necessary acidity and brightness.
– * Powdered sugar — 1 cup, sweetens and helps bind everything together.
– * Agave syrup — ¼ cup, adds sweetness while keeping things smooth.
– * Orange liqueur (substituted) — 2 tbsp fruit juice (like orange or pineapple), gives a fruity note without alcohol.
– * Vanilla wafer crumbs — 1½ cups, forms the solid exterior of each ball.
Smart Substitutions:
- Instead of cream cheese: Greek yogurt — results in a lighter texture and tangier flavor.
- Instead of agave syrup: Honey — provides similar sweetness but may alter consistency slightly.
Pro Tip: Look for finely crushed vanilla wafer crumbs at your store. If you can’t find them, place whole wafers in a plastic bag and crush them with a rolling pin until fine.
How to Make Margarita Balls
Quick Prep Checklist:
* Gather all ingredients before starting.
* Prepare your workspace with parchment paper for easy cleanup.
Step 1: Mix Ingredients
Start by blending cream cheese and lime juice in a mixing bowl until smooth. The mixture should be creamy without lumps; if it looks clumpy, continue mixing until it’s uniform.
Tip: Ensure your cream cheese is at room temperature to avoid lumps during mixing.
Step 2: Add Sweeteners
Next, sift powdered sugar into the bowl along with agave syrup. Stir until combined thoroughly. The mixture will start to thicken slightly as you incorporate everything.
Watch For: A thick but spreadable consistency indicates you’re ready for the next step.
Step 3: Incorporate Crumbs
Gently fold in vanilla wafer crumbs until evenly distributed throughout the mixture. It should hold together well but still have some texture from the crumbs.
You’ll Know It’s Ready When: You can easily form it into balls without it falling apart.
Step 4: Form Balls
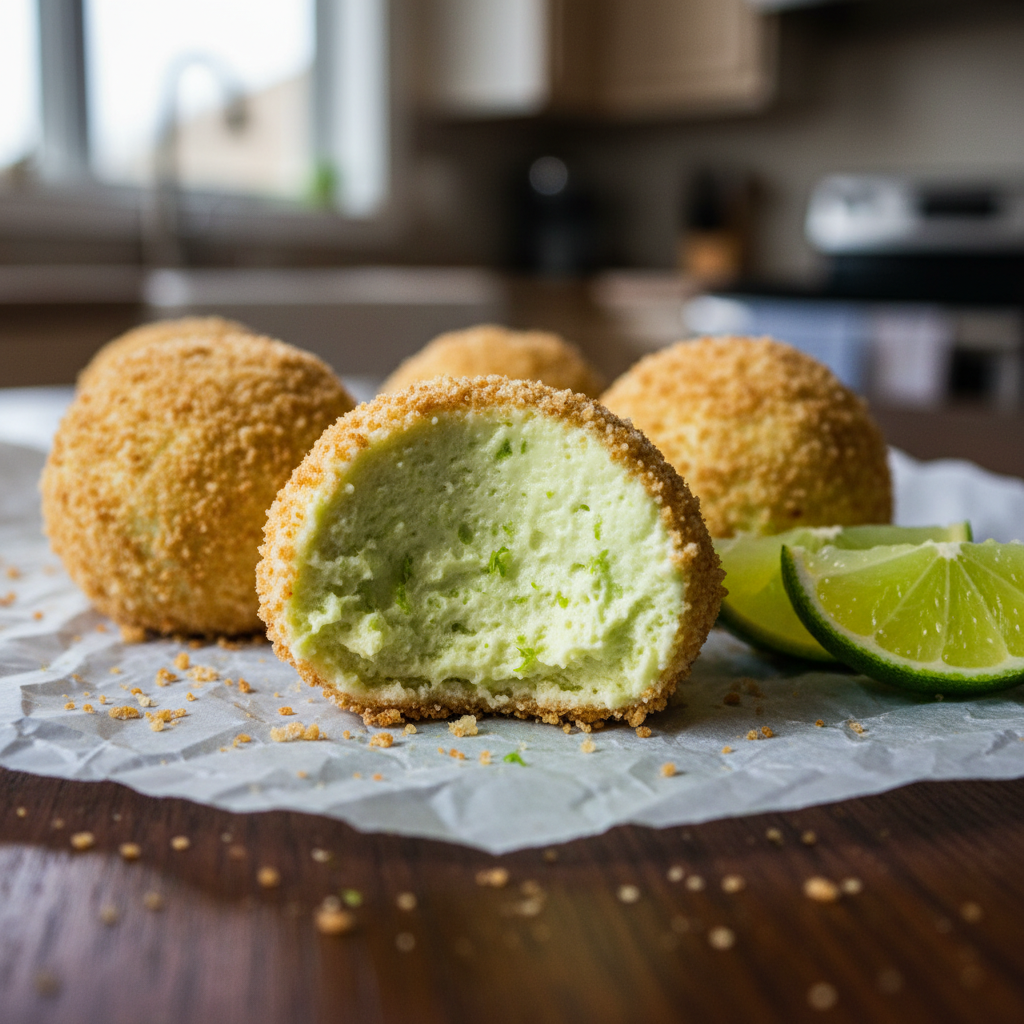
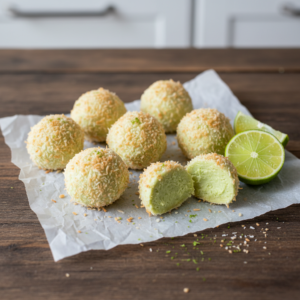
Using your hands or a small scoop, form bite-sized balls from the mixture and place them on parchment paper. Aim for uniform size so they chill evenly; about one inch in diameter works well.
Be careful not to overwork them; just enough pressure to shape is all you need here.
Step 5: Coat and Chill
If desired, roll each ball in more crushed vanilla wafers or toasted coconut for added texture before chilling them in an airtight container. Place them in the refrigerator for at least two hours or until firm enough to enjoy.
Avoid leaving them out too long before serving; they’ll become soft if they warm up too much.
✅ Perfect Results Checklist:
* Uniform ball size ensures even chilling.
* Mixture shouldn’t be too sticky after rolling; it should hold shape well.
* Flavor should be balanced between sweet and tangy after chilling.
Expert Tips & Variations
3 Pro Tips:
* Cool Your Cream Cheese: Warm cream cheese mixes better with other ingredients; allow it to sit at room temperature first.
* Chill Between Steps: If your mixture becomes too soft during preparation, refrigerate briefly before forming balls again.
* Test Flavor Before Chilling: Taste a small amount of your mixture before shaping; adjust lime juice or sweetness as desired now rather than later.
3 Variations to Try:
* Coconut Lime Balls: Substitute half of the powdered sugar with shredded coconut for extra crunch and flavor.
* Chocolate-Covered Version: Dip chilled balls in melted dark chocolate after chilling for an indulgent twist on this treat.
* Spicy Kick Variation: Add a pinch of cayenne pepper into your mix for an unexpected heat that pairs well with lime flavor.
Common Mistakes to Avoid
Mistake #1: Overmixing
I learned the hard way that overmixing can lead to tough texture instead of creamy softness. This happens because excess air incorporates into your mixture causing it to become dense during chilling. To prevent this, mix just until combined—no need to beat vigorously!
Mistake #2: Incorrect Chilling Time
Most home bakers miss this mistake by under-chilling their balls leading to difficulty handling them later on. Insufficient chilling keeps them too soft which makes rolling nearly impossible once formed. Ensure you give them ample time—at least two hours—in refrigeration before serving!
Mistake #3: Not Measuring Ingredients Accurately
When I didn’t measure properly one time, my batch turned out overly sweet or too tangy depending on what was off! This imbalance occurs because key ratios between ingredients matter greatly in no-bake recipes like these brownies. Always double-check measurements against what’s listed before starting!
Storage & Reheating
Room Temperature: Store at room temperature for up to two hours if serving immediately during gatherings.
Refrigerator: Keep chilled leftovers tightly covered in an airtight container for up to one week.
Freezer: Wrap tightly in plastic wrap followed by foil; freeze for up to three months without losing quality.
Reheating:
Oven: Preheat oven to 350°F (175°C) and warm covered with foil for about 10 minutes—this helps restore softness.
* Microwave: Use medium power level heating individually wrapped balls slowly at intervals of ten seconds—check frequently as they can soften quickly!
* Stovetop:* Use a non-stick pan over low heat covered loosely with lid—this retains moisture effectively while warming through gently.
Frequently Asked Questions
How long do these treats last?
They stay fresh stored properly in an airtight container in the fridge for about one week without losing flavor or texture.
Can I make these ahead of time?
Absolutely! You can prepare these treats two days ahead of when you need them—they actually taste better after being chilled overnight!
What’s an easy way to roll these balls?
Using slightly wet hands makes rolling easier since it prevents sticking while forming each ball—it’s very effective!
Can I use different flavored juices?
Definitely! Experimenting with other fruit juices like grapefruit or tangerine can create unique flavors that work well instead of lime juice or orange options!
Final Thoughts
These simple treats capture that refreshing margarita taste perfectly while offering ease and fun when preparing them at home! With Margarita Balls within reach anytime you crave something sweet yet zesty means dessert is never far away.
Did you enjoy making this recipe? I’d love hearing how yours turned out! Leave a comment below—I read every one! Rate it ⭐⭐⭐⭐⭐ and share it with friends who would love trying their hand at making these delightful bites too!

Margarita Balls
Indulge in the creamy, zesty delight of Margarita Balls, a no-bake treat that combines the tang of lime with sweet undertones. Each bite melts in your mouth, leaving you refreshed and satisfied. Perfect for gatherings or a quick snack, these delightful bites can be customized with your favorite flavors or toppings.
- Total Time: 15 minutes
- Yield: 24 servings 1x
Ingredients
- 8 oz cream cheese
- 2 tbsp lime juice
- 1 cup powdered sugar
- ¼ cup agave syrup
- 2 tbsp fruit juice (like orange or pineapple)
- 1½ cups vanilla wafer crumbs
Instructions
- In a mixing bowl, blend the cream cheese and lime juice until smooth and creamy, ensuring there are no lumps.
- Sift in the powdered sugar and add agave syrup, stirring until well combined and slightly thickened.
- Gently fold in the vanilla wafer crumbs until evenly distributed throughout the mixture.
- Form bite-sized balls using your hands or a small scoop, placing them on parchment paper.
- If desired, roll each ball in crushed vanilla wafers or toasted coconut before chilling them in an airtight container for at least two hours.
- Prep Time: 15 minutes
- Cook Time: 0 minutes
- Category: Dessert
- Method: No-Bake
- Cuisine: American
Nutrition
- Serving Size: 1 ball (25g)
- Calories: 85
- Sugar: 6g
- Sodium: 80mg
- Fat: 4g
- Saturated Fat: 2g
- Unsaturated Fat: 1g
- Trans Fat: 0g
- Carbohydrates: 10g
- Fiber: 0g
- Protein: 1g
- Cholesterol: 10mg