
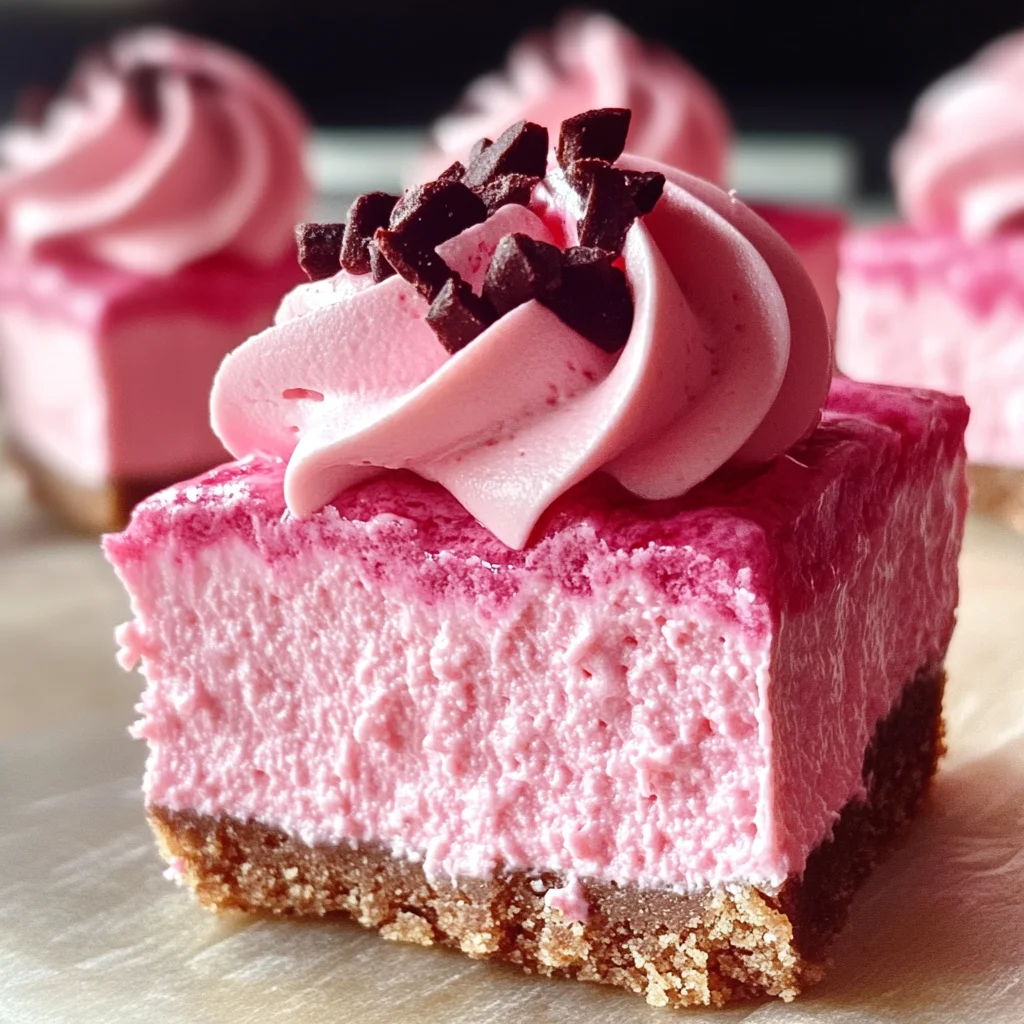
I’ve had my fair share of cheesecake recipes over the years, but the no-bake variety stands out for its simplicity and rich flavor. This recipe for No-Bake Pink Velvet Cheesecake Bites offers a creamy texture and eye-catching color that makes it perfect for any occasion. After testing different ratios of cream cheese and sugar, I discovered the ideal balance for a smooth filling that holds its shape well. In this article, you’ll find everything you need to create these delightful bites.
Why You’ll Love This Recipe
- No Baking Required — With no oven time, you can whip these up in under 30 minutes and let your fridge do the work.
- Creamy Texture — The combination of cream cheese and powdered sugar creates a rich, smooth filling that’s satisfying to bite into.
- Eye-Catching Color — The vibrant pink hue makes these treats stand out at gatherings or as a special dessert.
- Customizable Flavor — Feel free to tweak the vanilla or add other flavors like almond extract to create your own twist.
- Perfect Portion Size — Each bite is just small enough to satisfy without being overwhelming, making them great for sharing.
Ingredients You’ll Need
Main Ingredients:
– * Cream Cheese — 8 oz; provides richness and stability in the filling.
– * Powdered Sugar — 1 cup; sweetens the mixture while keeping it smooth.
– * Vanilla Extract — 2 tsp; adds depth of flavor.
– * Food Coloring — A few drops; gives that signature pink hue without altering taste.
– * Graham Crackers — 1 cup crushed; forms the base crust that adds crunch.
– * Butter — 4 tbsp melted; binds the crust together for easy slicing.
Smart Substitutions:
- Instead of cream cheese: Use mascarpone cheese — it will give a slightly sweeter flavor and even creamier texture.
- Instead of graham crackers: Try digestive biscuits — they offer a similar crunch with a different flavor profile.
- Instead of powdered sugar: Use granulated sugar blended finely in a food processor — just be mindful it won’t dissolve as quickly.
Pro Tip:
When selecting your cream cheese, opt for full-fat varieties. They provide better structure and flavor compared to low-fat versions, which can make your bites too soft.
How to Make No-Bake Pink Velvet Cheesecake Bites
Quick Prep Checklist:
* Gather all ingredients before starting to streamline the process.
* Prepare your baking dish by lining it with parchment paper for easy removal later.
Step 1: Prepare Pan
Line an 8×8 inch pan with parchment paper so that it hangs over two sides. This will make removing your bites much easier later on.
Step 2: Mix Filling
In a bowl, beat together softened cream cheese, powdered sugar, vanilla extract, and food coloring until fully combined. You want a smooth consistency without lumps; if needed, use an electric mixer on medium speed.
Step 3: Prepare Crust
In another bowl, combine crushed graham crackers with melted butter until evenly mixed. It should resemble damp sand when pressed together firmly.
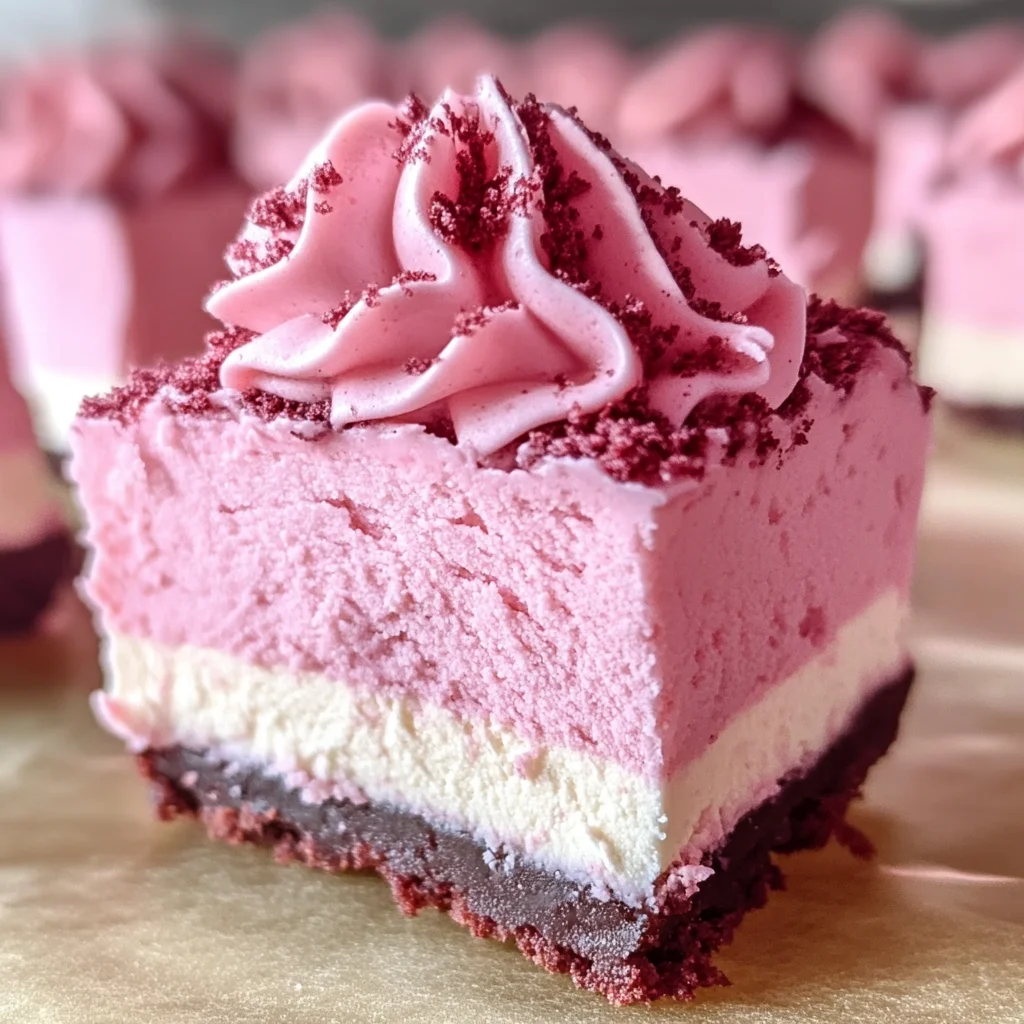
Step 4: Assemble Layers
Press the graham cracker mixture firmly into the bottom of your prepared pan to form an even layer. Make sure it’s compact so it holds up when sliced later—using the back of a measuring cup helps achieve this.
Step 5: Chill
Spread the cheesecake filling evenly over the crust layer using a spatula. Cover with plastic wrap or aluminum foil and chill in the refrigerator for at least four hours until set.
✅ Perfect Results Checklist:
* The top should be firm but slightly jiggly when shaken gently.
* The crust should feel solid under your fingers without crumbling easily when pressed.
* It should have chilled flavors mingled well together after sitting in the refrigerator.
Expert Tips & Variations
3 Pro Tips:
* Soften Cream Cheese Properly: Leave it at room temperature for about an hour before mixing. Cold cream cheese can lead to lumps in your filling that are hard to break down.
* Don’t Skip Chilling Time: Allowing adequate time in the fridge lets flavors meld and ensures proper set-up—you’ll appreciate this once you slice into them!
* Use Fresh Ingredients: Always check expiration dates on dairy products like cream cheese—fresh ones yield better taste and texture.
3 Variations to Try:
* Red Velvet Twist: Add cocoa powder along with food coloring for an extra chocolatey version that still maintains its pink color.
* Fruit-Filled Treats: Layer fresh strawberries or raspberries between crust and cheesecake layers for added freshness—just slice fruit thinly!
* Nutty Crunch Topper: Sprinkle chopped nuts or chocolate chips over the top before chilling for added texture contrast against creamy filling.
Common Mistakes to Avoid
Mistake #1: Overmixing Filling
You may notice lumps or air bubbles if you mix too vigorously after adding sugar. This happens because incorporating too much air can break down structure in cheesecakes. To avoid this issue, mix gently once you’ve added dry ingredients until just combined.
Mistake #2: Crust Falling Apart
If your crust crumbles easily upon slicing, it was likely not pressed firmly enough into place before chilling. Insufficient pressure prevents binding from occurring during setting time which leads to instability later on. Press firmly using even pressure across all parts during assembly phase!
Mistake #3: Not Allowing Enough Chill Time
Many home bakers underestimate how long their dessert needs solidifying time—they want instant results! If removed too soon from fridge while still soft within center area could ruin presentation when cut into squares instead of clean slices expected! Aim for at least four hours chilling time before serving these treats!
Storage & Reheating
Room Temperature: These bites are best stored chilled but can sit out during serving time for about two hours safely.
Refrigerator: Store leftovers covered tightly in an airtight container where they’ll last up to one week without losing quality.
Freezer: Wrap each bite individually in plastic wrap followed by aluminum foil—and freeze flat—for up to two months while maintaining freshness!
Reheating:
- Oven: Preheat oven to 350°F (175°C) then warm wrapped bites just until softened inside (about five minutes).
- Microwave: Heat on medium power level in increments of ten seconds—avoid overheating as this makes them mushy!
- Stovetop: Use a non-stick skillet over low heat covered tightly with lid ensuring moisture retention—check frequently till warmed through.
Frequently Asked Questions
Can I use low-fat cream cheese instead?
Yes, but keep in mind that low-fat options may result in a softer filling that’s less stable than regular cream cheese would provide.
How long do these treats last?
Your batch remains fresh up to one week when stored properly in an airtight container within refrigeration—perfect for enjoying throughout busy weeks!
Can I add fruit into my bites?
Absolutely! Layering thin slices of strawberries or raspberries works wonderfully between layers providing delightful bursts of flavor alongside creamy goodness!
Is there any way I could make them vegan?
Certainly! Substitute cream cheese with vegan alternatives made from cashews or tofu paired together with non-dairy milk—a delicious option waiting discovery!
Final Thoughts
These no-bake cheesecake bites are perfect whether you’re hosting friends or simply treating yourself after a long day. Their creamy texture coupled with vibrant colors elevates any dessert table effortlessly while satisfying those sweet cravings efficiently.
If you’ve enjoyed making No-Bake Pink Velvet Cheesecake Bites today, share your thoughts below! I’d love hearing how yours turned out—don’t forget rate ⭐⭐⭐⭐⭐ and pass along this recipe if you found value!

No-Bake Pink Velvet Cheesecake Bites
Indulge in these delightful No-Bake Pink Velvet Cheesecake Bites that melt in your mouth, offering a creamy and rich texture with every bite. The vibrant pink color is visually appealing, making them perfect for any gathering or special occasion. With a simple preparation process, you can easily customize flavors to suit your taste.
- Total Time: 15 minutes
- Yield: 16 servings 1x
Ingredients
- 8 oz cream cheese, softened
- 1 cup powdered sugar
- 2 tsp vanilla extract
- A few drops food coloring
- 1 cup graham crackers, crushed
- 4 tbsp butter, melted
Instructions
- Line an 8×8 inch pan with parchment paper, allowing it to hang over two sides for easy removal later.
- In a bowl, beat together softened cream cheese, powdered sugar, vanilla extract, and food coloring until smooth and creamy.
- In another bowl, mix the crushed graham crackers with melted butter until it resembles damp sand.
- Firmly press the graham cracker mixture into the bottom of the prepared pan to form an even crust layer.
- Spread the cheesecake filling evenly over the crust using a spatula, smoothing the top before covering it with plastic wrap.
- Chill in the refrigerator for at least four hours until set; you'll know it's ready when it has a slight jiggle.
- Prep Time: 15 minutes
- Cook Time: 0 minutes
- Category: Dessert
- Method: No-Bake
- Cuisine: American
Nutrition
- Serving Size: 1 bite (30g)
- Calories: 110
- Sugar: 6g
- Sodium: 80mg
- Fat: 7g
- Saturated Fat: 4g
- Unsaturated Fat: 2g
- Trans Fat: 0g
- Carbohydrates: 9g
- Fiber: 0g
- Protein: 2g
- Cholesterol: 20mg